You may think that painting is painting, and if you can paint a wall, you can paint a car. Nothing could be further from the truth. Painting a car is a very precise and specific task, and it requires a collection of focused and often expensive equipment. In this article, we go over the equipment and steps needed to paint a car in your garage. Read on to learn more.
What You'll Learn Today
- 14 Considerations If You Paint A Car In Your Garage
- Safety First!
- Painting A Car Takes Equipment, Materials & Skill
- What Do You Need To Paint A Car In Your Garage?
- How Much Paint Do You Need?
- Set Up Your Work Area
- Successful Car Painting Takes Time
- Get Your Sander
- Prepare Your Prime Coat
- Apply The Primer
- Sand The Prime Coat
- Apply The Paint
- Apply The Clear Coat
- Buff It Up
- Painting A Car In Your Garage Is Not A One-Off
14 Considerations If You Paint A Car In Your Garage
Safety First!
Be aware that, when you are painting a car, you are dealing with volatile chemicals and some potentially dangerous equipment. Follow these safety precautions as you work:
- Be sure the area where you will work is well ventilated. Volatile organic compounds (VOC) found in the paint you will be using are hazardous to your health. They may remain in the air in an enclosed, unventilated area for several days.
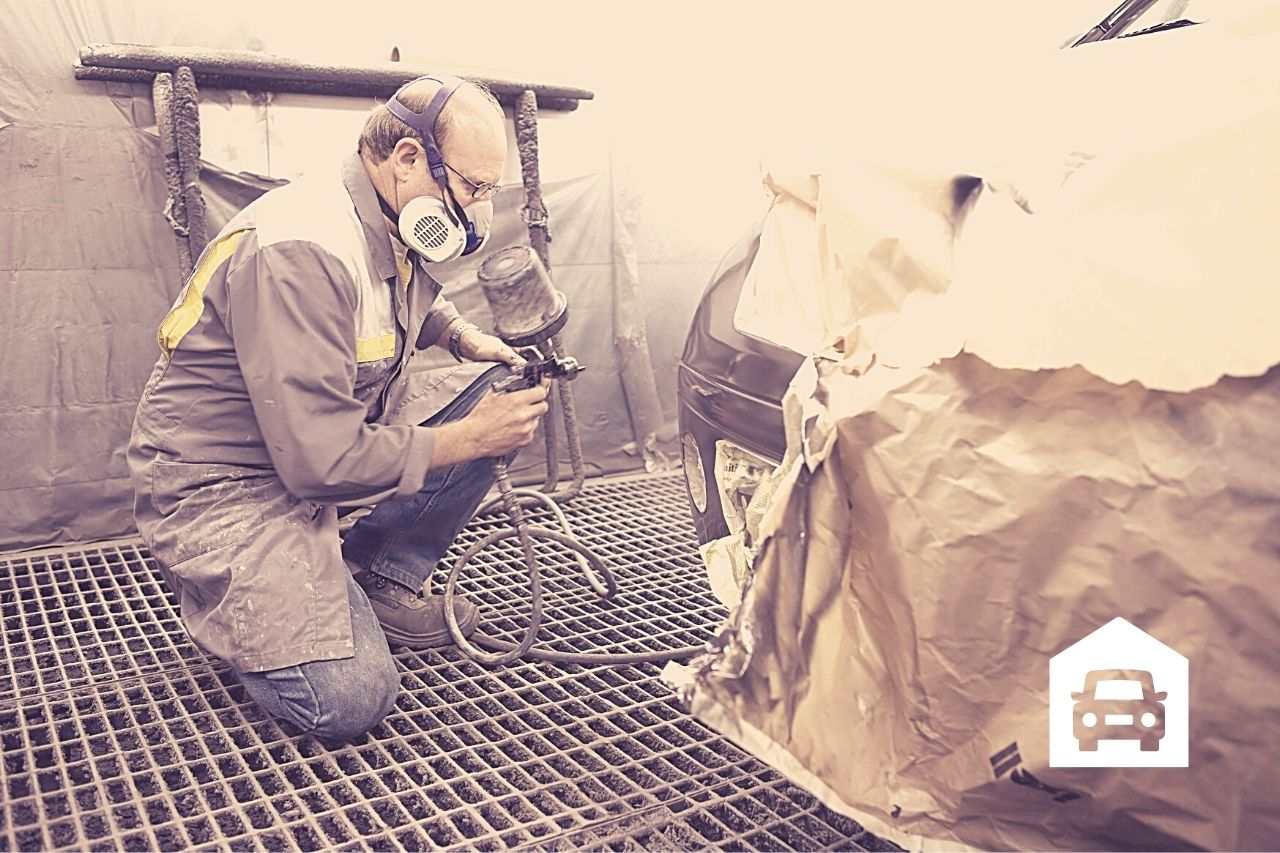
- Wear a respirator while using a spray gun to avoid inhaling the fine droplets of the spray. VOCs can do great harm to your lungs.
- Wear long pants and long sleeves, gloves and head and face coverings to avoid exposing your skin to the paint.
- Keep a clean, safe work area. Tidy up any tripping hazards as you work. If you spill any chemicals, stop and clean them up immediately to avoid slipping and to avoid tracking them out of the garage on the soles of your shoes.
- Always read and follow all of the instructions that come with your equipment and the toxic substances you’ll be using.
Painting A Car Takes Equipment, Materials & Skill
Painting a car is complicated, and you need to practice quite a bit to develop the skills needed to pull it off successfully. If you can get your hands on an old car body, door or panel for practice, it’s a good idea. This will give you a chance to gather and work with your equipment, as well as setting up a dedicated painting space in your garage.
When you practice, be sure to hold your spray gun a consistent 6 inches away from the panel. Sweep steadily from side-to-side while holding down the spray gun’s trigger while the gun is in motion.
If you continue to hold it down at the point at which you change directions, you’ll see that you get thick spots at this point. This will cause drips and runs in the paint surface.
What Do You Need To Paint A Car In Your Garage?
The list of items necessary for painting a car is extensive. Of course, you’ll need paint, but you’ll also need:
- Newspapers or brown paper to mask off
- 1200-grit wet-and-dry sandpaper
- 2000-grit wet-and-dry sandpaper
- Air compressor or spray gun
- Dust extractor
- Electric sander
- Paint thinners
- Masking tape
- Safety glasses
- Face masks
How Much Paint Do You Need?
If your car is small or mid-sized, you will need:
- Primer- 1 gallon
- Topcoat- 3 gallons
- Clear coat- 2-3 gallons
If your vehicle is large, you’ll need:
- Primer-1.5+ gallons
- Topcoat- 4 gallons
- Clear coat- 3-4 gallons
This may be more than you need, but you are better off having paint to spare than not having enough. Also, you’ll have extra on hand if you need to do touchups in the future.
Set Up Your Work Area
When you have your supplies in place, you’ll need to get your work area ready. You want everything nice and clean, so start by sweeping out your garage thoroughly and removing anything that might get in the way.
Successful Car Painting Takes Time
When you feel ready to paint your car, you’ll need to set aside a good block of time for the task. It can take a week or so to finish the project correctly.
Begin by deciding exactly what parts of the car you wish to paint. Do you plan on painting the door sills? What about the trunk and the engine bay? Make these decisions right at the outset and set your job up accordingly.
Be aware that painting these areas will make the job more complicated and will add time to the job. You’ll also need quite a bit more skill to paint the engine bay.
The quickest and simplest thing to do is to mask these areas off and just paint the exterior, but before you do that, you’ll have to prepare the surfaces to be painted.
Get Your Sander
Use your electric sander to remove all of the paint from the exterior of the vehicle. It’s best to get down to bare metal. You can remove most of it with the electric sander, but you’ll need to hand-sand the crevices and the corners. Once all the paint is off the vehicle, you’ll want to wash it down, dry it and then mask off the areas you don’t plan to paint.
TIP: If you don’t have time to sand off all the paint, you can just rough up the entire surface you plan to paint. Just be sure to create the smoothest surface possible so that the new paint will stick.
How To Paint A Car At Home In 15 Minutes!
Prepare Your Prime Coat
Once you’ve got everything smooth, clean and masked off to your satisfaction, you can mix up your primer and start painting. Follow packaging instructions to blend thinner and primer thoroughly and in the correct amounts.
Apply The Primer
Start painting from the roof and work your way down. Remember that multiple even, thin coats are much better than one thick coat. You’ll want to apply a couple of coats (maybe even three) to every surface.
Work quickly, applying paint to each panel in ten minutes or less. Allow each coat of paint to dry for a minimum of twenty minutes. It’s better if you can allow a full hour of drying time between coats.
Once you’ve applied all of the primer you plan to, clean your spray gun with thinner and set it aside to dry.
Sand The Prime Coat
After your final coat, it’s a good idea to wait overnight to sand, but if this is not possible, allow at least an hour’s curing time. You’ll find that the dry primer has a powdery finish. Use 2000 grit sandpaper to smooth this out.
After this, lightly wipe down the surface with a clean cloth soaked in thinner. Don’t apply a lot of pressure or a lot of thinner. Your objective is to remove any powdery primer residue, but you have to be careful not to remove the primer!
Apply The Paint
Just as with the primer, read packaging instructions carefully to be sure of mixing the right amount of paint with the right amount of thinner. Apply the prepared paint in exactly the same way you applied the primer.
You’ll want 3 or 4 light coats, but do your sanding and wipe-down before the final coat. Allow the final coat to dry thoroughly (overnight is best) and then you can apply your clear coat.
While you’re waiting, you can clean your spray gun.
Apply The Clear Coat
The amount of drying time needed for the clear coat may be different from that needed for primer and paint. Read the instructions on the can very carefully for best results.
Apply the clear coat just as you have applied primer and paint. Before the last coat of clear coat, sand lightly and wipe down the surface.
After the final coat, you should unmask the masked areas right away. Do this carefully to avoid marring the wet clear coat or getting bits of paper and tape stuck in it.
Allow the clear coat to cure completely and then examine your paint job. If you find imperfections, you can fix them by sanding with 2000-grit sandpaper and spraying again.
Buff It Up
Once the job is done and the clear coat is completely cured, use your buffer to perfect the finish. Use the same concept when buffing as when spraying. Move lightly and consistently. Be careful not to hold the buffer in one area for a long time because this will burn the paint.
Painting A Car In Your Garage Is Not A One-Off
Clearly, it takes quite a bit of preparation, expenditure and practice to learn how to paint cars and to complete the job. For this reason, you may not actually save money (or get good results) painting one car. Once you are set up and have a little experience under your belt, you can save money and get custom results with DIY car painting.
Since my garage is not so big, I prefer painting stuff outside. More space and more comfortable